Plant based Munchies

A journey towards whole food, plant based, healthy eating….


2 Comments

Walnut bolognese

walnut bolognese

walnut bolognese


Wow, this recipe is so extraordinarily exciting. I’m so in love that I can barely stop eating this sauce long enough to serve it! And I have reused it in a variety of ways. It’s gorgeeeouuusssss ❤


Ingredients:

1 brown onion, finely diced

5 mushrooms, finely diced

1 cup walnuts, loosely processed in food processor into a rough crumb consistency

1 400gm tin crushed tomatoes or a 400g jar passata

1 Tblspn balsamic vinegar

2 garlic cloves

1/4 tsp italian herbs

1/4 tsp onion or garlic powder

pinch chilli flakes

pinch smoked paprika

salt and pepper


Saute the onion, adding in mushrooms and garlic. Saute until reduced in size and browning. Add in remaining ingredients and simmer gently for 5-10 minutes.


5 Comments

Chocolate hazelnut spread

Chocolate hazelnut spread

Chocolate hazelnut spread


Why oh why has it taken me so long to venture into a homemade healthy plant based nutella? There is no going back after making this. The main key (as I discovered) is NOT to burn the hazelnuts if you choose to toast them. Haha 🙂 Rookie error.

This is delicious – as a dessert sauce on strawberries or a day time snack on banana slices or just straight out of the jar. I guess people spread nutella on bread, yes? I don’t really eat bread these days but if that’s your thing, then this recipe is for you too. The best bit is, rather than being made primarily from oil and sugar, this is made primarily from cacao and hazelnuts. Win!

2 cups hazelnuts

1/3 cup cacao

1/3 cup rice syrup

1/3 cup coconut cream

1 tsp vanilla extract

* This recipe is really here as a guide. I like mine quite textured (like crunchy peanut butter) but if you prefer it smooth and soft, grind the nuts for longer, and add a touch more coconut cream or non dairy milk to make it runnier). If you like more chocolatey spread, add more cacao. If you want it sweeter, add more rice syrup or try blending in some soaked dates (healthier, but will make it thicker).

Roast the hazelnuts for 5-10 minutes until fragrant at 200 deg C, then rub with a towel to remove the skins. Don’t worry, not ALL of the skins will come off but most of it will.

Blend in a food processor until a paste forms, then add remaining ingredients and process together.

This will keep well in the fridge but I doubt it will even last a week…good luck 🙂


3 Comments

Homemade soy yoghurt (strawberry)

Strawberry soy yoghurt

Strawberry soy yoghurt

Despite my seeming obsession with coconut yoghurt, I realised I have been remiss in updating Plant Based Munchies on the fact that we actually are now making homemade soy yoghurt as our staple. The kids, much to my devastation, don’t like the strong coconut flavour of coconut yoghurt! Unbelievable, I know!

I am pretty firmly in an anti-commercial soy yoghurt camp at the moment. They are SO expensive for what they are, and even the plain soy yoghurt is incredibly sweet. So I like this. And so do the kids. Their favourite has actually been mango but this week will be a strawberry adventure for them 😉

I’m also enjoying using the plain yoghurt in cooking. It’s new-ish to me – I have never really done it in the past. But now that we have yoghurt easily and economically available, it’s all good!

Below are two different recipes. You can decide 😉

First let me say, you don’t have to use soy milk. The important thing is that the milk you use has a decent fat content (i.e. 4% or more). My favourite for yoghurt is Bonsoy because it is such a quality soy milk and such a mild flavour but it IS the most expensive soy milk possible so it’s up to you. Sometimes we do combinations, sometimes we add in rice milk too. You could do a combination of rice milk and coconut cream if you like (lessens the coconut flavour but increases the fat content of the rice milk).

The other thing really is that you can choose however you want to thicken it or IF you do. Runny yoghurt is fine too, it’s just runny.

Anyway here’s:

Recipe 1

500ml organic (non GM) soy milk

1/3 tapioca starch

1 T rice syrup

1/4 cup soy yoghurt

1 tsp vanilla extract

Whisk starch into soy milk and add other ingredients.

Place in a yoghurt maker for 8 hours and then refrigerate.

(It may help to warm the milk (not boil) before this process to help incorporate the starch and kick off the yoghurt fermentation process).

Recipe 2

 600ml soy milk

1 T xanthan gum

1 T rice syrup

1/4 soy yoghurt

1 tsp vanilla extract

Heat soy milk until warm and whisk in xanthan gum until smooth (use a stick blender if required).

Add in rice syrup and vanilla, and cool to luke warm before adding in yoghurt.

Place in yoghurt maker for 8 hours.

If you need other ideas to keep yoghurt warm other than a yoghurt maker, see this post here.

Yoghurt is not a difficult process. It seems it, but there are sooo many options, it’s hard to go wrong. I’ve found the yoghurt will thicken in the yoghurt maker but it really sets once it is refrigerated.

For the pictured strawberry yoghurt, I just processed 1 cup of yoghurt with 1 cup strawberries (approximately). Yum! If you like a sweeter yoghurt, feel free to add more sweetener.

Luck!


2 Comments

Homemade coconut yoghurt

Homemade coconut yoghurt

Oh yes. It is here 🙂 And it is worth the wait.

What you will need:

1/2 cup soy or coconut yoghurt with live cultures – (or you could use dairy free probiotic pills or vegan yoghurt culture)

4 cups coconut cream

1 T rice syrup

1/4 cup tapioca flour/thickening agent

1 Thermometer

First, get your jar/s sterilised and ready and warm (either in boiling water or an oven).

Second, put iced water in your sink, ready.

Whisk the tapioca flour and 1/2 cup coconut cream until smooth. Add 2 1/2 cups coconut cream and whisk.

Heat until at 80-85 degrees Celsius (180 deg F).  Whisk in the remaining coconut cream and transfer the saucepan to the iced water in the sink to bring the temperature down.

When the temp comes down to 46 deg C (115 degF), add in the yoghurt (or culture or probiotic) and rice syrup.

Stir through, then add your yoghurt mix to jars.

The trick now is keeping them warm. There are many ways it seems!

You could heat your oven slighlty (as low as it will go), then turn it off and leave your yoghurt in there overnight (mostly people say a 60W bulb in an oven will be enough!). Make sure you don’t heat your oven so much that you bake your yoghurt! 🙂

You could wrap your jars with towels and place them in an esky with a warm wheat pack.

You could always use a yoghurt maker!

Or I’ve even read of someone who placed their bowl (with a lid) on top of their modem and put a desk lamp pointing down on top. Lol!

I placed my jar of warm yoghurt in an oven mit, wrapped it up with a towel and placed it in a small cooler bag which is heavily insulated.

Either way, it should take at least 8 hours for the cultures to grow.

Then you can pop it in the fridge and add passionfruit/raspberries – whatever you like to it as desired. Or eat it as is! YAY! I love having plain coconut yoghurt in the fridge and then of a morning, can decide which flavour I would like it. We have done vanilla, mixed berries and passionfruit so far. Blend it up with strawberries would be gorgeous too.

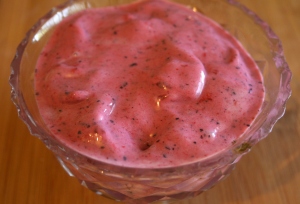
Here’s what the berry one looked like:

Berry coconut yoghurt

It’s a pretty involved but very quick process actually and saves a TON of money buying commercial yoghurts. Depending on how much you buy your coconut cream for, what I’ve worked out is that this costs 20-30% of the cost of buying commercial coconut yoghurt.

Amazing. EDIT: Actually, I don’t know where I got that figure from. 250ml of coconut yoghurt costs $10 to buy commercially. Say you spend $6-7 on buying coconut cream, that will actually give you 500ml of yoghurt, maybe more. I should work it out exactly but the bottom line is, it is sooo cheap to do.

IMG_5772-001


Leave a comment

Homemade hoisin sauce

No lovely pics with this one, just a functional sauce recipe for the Chinese hoisin sauce for use in Asian cooking. Easy and much nicer to make your own so you know what’s in it! 🙂

4 tablespoons soy sauce (use tamari for gluten free)
2 tablespoons peanut butter (sugar free, all natural)
1 T Agave/rice syrup
2 tsp  rice wine vinegar (something like apple cider vinegar will work)
1 garlic clove,  minced
2 tsp sesame  oil
sprinkling of chilli
black pepper

Whisk together to form a sauce.
(Adapted from chinesefood.com)


1 Comment

Mayonnaise (the plant based way) and a waldorf(ish) salad

Mayonnaise - the plant based way

Mayonnaise – the plant based way

Unbelievable but true. Here is a delicious vegan mayonnaise. I’ve researched this, I promise. And the best recipe yet goes to Veggieful: very impressive. And here’s my version of their version! It really is STUNNING.  And even if you are not vegan, you will love this healthy tasty mayonnaise. (I promise there is nothing about it that tastes soy or tofu ish!).

300g silken tofu (use organic so it’s non GMO)
1/4 teaspoon salt
2 tspns rice syrup
1 diced garlic clove
3 tspns dijon mustard
1 Tblspn  oil
1 Tblspn apple cider vinegar

Squeeze of lemon.

Add all ingredients into a blender and blend away. Refrigerate for a couple of hours so that it thickens up a little.

Seriously. This is so yummy I kept eating it off the spoon before it even made it to the fridge!

IMG_5703-001

I actually wasn’t sure what to do with mayonnaise. Hmmm….

So I made a waldorf(ish) salad.

Iceberg lettuce

Green apple, chopped

cucumber, chopped

snow peas, chopped

Avocado slices on top

and….it’s supposed to be walnuts (but I didn’t have any so I used almonds and cashews)

Toss it with the mayonnaise – delicious lunch!

Waldorf salad


Leave a comment

Vanilla cashew milk

Vanilla cashew milk

Vanilla cashew milk

Our house has been a bit ridiculous lately with various milks. My favourite is probably Bonsoy which I went off for a few years after their Iodine disaster. Never mind. The problem is, soy milk, though I like it, has that question mark hanging over its head about how good it actually is long term as a primary milk? Especially for the little boys we have in our house whom also love soy milk. (The youngest will drink anything if it is in a yellow packet – his favourite colour :P)

Dave prefers almond milk but both of these milks are ridiculously expensive. Rice milk…well, it tastes like rice.

So I entered the territory of milk making. And might I say… I really like this. It is wholesome, cheap and healthy. There’s no hidden weird things (like in many soy milks) and no added sugar. It just…is.

This gets a big tick of approval from me and we will be whizzing these up every day or two, it is so easy.There is no weird straining etc with this one. As long as you have a relatively decent blender, these cashew will just pulverise, having been soaked.

1 cup cashews

1 fresh date

1 tsp vanilla

4 cups water

Soak cashews overnight in a bowl of water. In the morning soak the date in hot water for about a minute, just to make it extra soft, and drain the cashews (best to throw that water away).

Add cashews, date, vanilla and water to your blender and blend it on high until smooth.

Vanilla cashew milk

Vanilla cashew milk

This really is an insanely quick process, and the milk turns out creamy and sweet and nutty. It’s lovely!


Leave a comment

Raspberry chia jam

Raspberry chia jam

This is so exciting to me. Our kids love jam and we are meany parents who don’t let them have it…well, very rarely. Jam is at least 50% white sugar and the fruit is stewed so much that any goodness in it is pretty much long gone. It used to be used as a special treat and was an economical means of preserving left over fruit so as to not waste it. Now? Put fruit in a freezer, don’t stew and jam it. It has become a modern day convenience food rather than a ‘sometimes’ food and there is little good about it. *rant over*

Here is a jam that is rich and powerful in flavour, and you don’t need to feel guilty about eating it. It also won’t rot your children’s teeth. It is raw, so the raspberries maintain all their fruitful goodness – packed with vitamins and minerals. This recipe also uses half a cup of chia seeds which as we know is a superfood, containing 6x more calcium than milk by weight and 3x more iron than spinach. Chia seeds also have 23% protein.
So I’m pretty happy with this.

500 gm raspberries (frozen but thawed) or fresh

1/2 cup chia seeds

2 T dark agave nectar (or coconut sugar/coconut palm sugar)

All that is needed is to blend the raspberries and sugar in the food processor or blender, add the chia seeds, and refrigerate overnight to allow the chia seeds to become gelatinous.

In the morning you will have a magical healthy, happy jam. As you can see, I served this up (for myself!) with organic corn thins and apple wedges and am still feeling the joy of it 🙂

Thanks to Veggiehead for the recipe idea. I have cut down the sweetener but you will each need to adapt it according to your requirements. I love the punch of raspberries and don’t think it needs too much sweetening. I’m intending on using this jam to make the kidney bean cakes – raspberry for flavour and chia for the egg replacer. Gold!


Leave a comment

Almond, orange and ginger dressing

Ginger, almond and orange dressing

This is great. I got the recipe from Healthy Girl’s Kitchen but have reduced the tahini and dates a little and added in some orange zest. It’s a great dressing! (Have a look at that site, I love the beautiful list of no oil salad dressings!).
1/2 cup raw almonds

1/2 cup unsweetened soy, hemp or almond milk
1 cup water
3 T tahini or unhulled sesame seeds
4 pitted Medjool dates
 1 small/medium clove garlic
1 inch piece fresh ginger, peeled
2 T orange zest
Juice of 1 orange
Blend all ingredients in a decent blender. I find with ours, you can only add a teeny bit of moisture until the bigger things have ground down, and then can add the rest to get a smooth mix. Play around with your blender if you’re having similar issues.


Leave a comment

Basil infused vinegar

If you are anything like us, you just about need a shelf for vinegars and oils. We have apple cider, red wine, white wine, white, brown, balsamic, raspberry…umm…anything else?

Recently I was looking for ideas as to what we could do with our enormous amount of basil growing in the veggie patch!

Basil patch


As you can see it has gone a bit nuts. What I came up with was another vinegar to add to our collection: basil vinegar! And it’s really quite good!

All i did was cut off all the heads of basil and pop them in a jar with white vinegar. I put it in the fridge for a week or two, and wowww, is it ‘punchy’. Next time I think I might use a softer vinegar such as apple cider instead of white but the basil infusion is beautiful.

Basil vinegar


I might try some basil oil next time? Basil pesto? Basil bread? So much basil!


Leave a comment

Sensational tomato ‘sauce’

My kids LOVE tomato sauce. We, of course, would like them to eat a homemade tomato sauce that is packed with goodness rather than sugar and salt. So this is what I came up with…

IMG_2770

There is no ‘real’ recipe to this. I threw in whatever vegetables – pumpkin, cauliflower, zucchini, brocolli, onion, celery – and don’t forget to season it and add garlic! When the veggies cooked down a little I added:

400gm tin of tomatoes, red kidney beans, brown lentils, red capsicum and a dash of balsamic vinegar (to try to help the acidity balance). I did also add a decent squirt of tomato paste to give it some extra richness.

After I let it simmer away for 30 minutes or so, I took some out and pureed it – which thankfully the kids enjoy! I used some, as is, in a risotto for that night’s dinner, and popped the rest in the freezer for another day.