Plant based Munchies

A journey towards whole food, plant based, healthy eating….


1 Comment

Cucumber “sushi” rolls

Cucumber 'sushi' rolls

Cucumber ‘sushi’ rolls

Ok so there’s nothing really sushi about this except it’s bits of stuff rolled up in more stuff. But hey. I’m not even really sharing a recipe today per se but more so an idea. You can make it in whatever way works best for you.

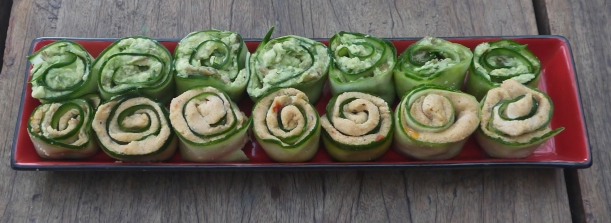
I made these little cucumber rolls for a dinner party as an appetiser. They were so lovely and I like the idea and how fresh and adaptable they are.

Get a long cucumber (in Australia, they are called Continental cucumbers) and finely slice it length ways (or use a peeler if that works for you). The idea then is to spread a filling along the length and then roll it up. Simple!

I used two fillings. You can see the cashew cheese which is an absolute favourite of mine, although it is orange because I have taken to adding 1/4 cup of sun dried tomatoes into the mix as well. Divine!

The second filling was a simple caper guacamole. Capers are not something I am used to but I quite enjoyed it! A salty little zing in a creamy avocado with lemon. Our dinner party differed in favourites of the two. Although I liked the caper guacamole, I preferred the texture of the cashew cheese (less slimy!) but others preferred that. So go with what you love, I say.

I think it would be great to do a beetroot dip and get that beautiful pink colour. Maybe next time.

Enjoy, and let me know what great ideas you come up with for this!


3 Comments

Banana choc-chip cake balls

Banana choc-chip cake balls

Banana choc-chip cake balls

Ooo these are DE-licious. I can’t stop eating them! You don’t need to make balls out of these by the way. I also made a loaf tin which worked (albeit denser), and muffins will be fine too. But cake balls are fun if you have the ball mould 🙂


4 medium very ripe bananas

10 medjool dates, pitted and soaked in hot water briefly

3/4 cup tapioca flour (starch)

1/2 cup brown rice flour

1/2 cup buckwheat flour

1/2 cup non dairy milk (with 1 tsp vinegar added)

80 gm dark non dairy chocolate, roughly chopped

2 tsp baking powder

1 tsp bicarb soda

1 tsp vanilla extract

pinch salt


Mix dry ingredients in a bowl.

Blend dates, bananas, milk (and vinegar) and vanilla together until a smooth paste forms.

Combine mixtures and stir until mixed.


Spray an oven cake pop tin and spoon mixture in, add lid, and bake at 190 deg Celsius for 15-20 minutes (or alternatively, bake muffins in a muffin tray).

Test with a skewer and remove when cooked in the middle.

Enjoy!


3 Comments

Garlic and chives cashew cheese

Garlic and chives cashew cheese

Garlic and chives cashew cheese

Ok so it looks like a green plastic sausage. I have made this a couple of times now and…we really like it…! The second time I refrigerated it in a cling-wrap-lined bowl and turned it out in a dome shape. MUCH better than a sausage 🙂

I’ve tended to steer away from “pretend” cheese but you can either think of it as a cheese, or perhaps a dip. It has a firm enough texture though that can be sliced to put on crackers – and all in all, it’s wholesome and yum! And easy to do.


2 cups raw cashews (presoaked, overnight is best but for at least 4 hours in water)

3 Tblspn nutritional yeast (great Vit B 12 for vegans, also important flavour for this)

2 small-medium garlic cloves (minced)

1 tsp salt (salt is important, don’t skip it!)

juice of 1 lemon

1 tsp apple cider vinegar

1/4 cup finely diced chives (or less, depending on your preferences).

Optional- shake of onion powder and or/ other herbs such as thyme.


Blend the cashews in a food processor. Add in remaining ingredients and turn into a lined bowl. Refridgerate until ready to eat (I would give it at least 1-2 hours.

NB. If you don’t want the cheese green, don’t blend the chives through it. You can mix them through as little green pieces after blending the other ingredients.
Thanks to Blissful basil for the recipe start.


3 Comments

Brown rice and mushroom balls


Brown rice and mushroom balls

Brown rice and mushroom balls


I apologise for the iPhone, dimly lit photo. My lovely cousin was running in the Commonwealth Games (and came 3rd!) and I was super distracted by getting our little food party out in front of the TV in time to watch her run. So the photos fell to the bottom of the priority pile.
As it turns out, while Jess was running, we were munching down a delicious feast of new creations. These are brown rice balls with mushroom and natural peanut butter. You can mix these up as much as you like – the possibilities are endless, but thees are delicious as is.  Enjoy!


2 cups brown rice (cooked).

1 brown onion, diced

5 mushrooms, diced finely

1-2 Tblspn natural peanut butter

1 Tblspn tamari (GF soy sauce)

2 Tblspn tapioca flour

1 clove garlic, diced

1 shake of dried chilli flakes

1/2 tsp salt


Fry onion and garlic together with the mushrooms until reduced and cooked well. Add in tamari, chilli and peanut butter with seasoning. Add in rice, turn off the heat, and stir through tapioca flour (to help bind).

Roll into balls. Heat a small saucepan with enough coconut oil to either deep fry, or shallow fry 1/2 of the ball. When oil is very hot, place 4 balls in at a time for a minute or so each side, then turn over to cook the other side. Allow balls to drain on paper towel.


Serve with peanut dipping sauce.


Leave a comment

Almond ginger cookies (GF)

Almond ginger cookies

Almond ginger cookies

It’s been a long time since I made biscuits. We are off the sugar bandwagon with our kids but I do miss cooking with them. And last night my 3 yo was dreaming talking about ginger biscuits. He woke up asking for them! So I thought today we really need to master how to do them well without butter, eggs and sugar.

It turns out it’s possible. Oh my, we absolutely gobbled these biscuits and felt no guilt about it at all! hehe! Well, no concern about negative health impacts at least. These are full of goodness and if you were to sub in fresh ginger I’m sure the benefits would be even more so. The one thing I would say, is that we ate so much of the mixture (far out, totally moorish!) that there weren’t too many biscuits that actually got made in the end. Nevermind!

I think I might use this cookie dough in coconut ice cream at some point!

Sadly, mr 3 has asked for them in his lunch box tomorrow and of course, the school and child care centre don’t allow nuts so these will be a home based treat for us. Yay you if you’re allowed nuts in lunch boxes though, this is a winner!

Ingredients:

2 1/2 cups almond meal

1/2 cup buckwheat flour

1 tsp bicarb soda

6 dates

1 T chia seeds soaked in 1/4 cup water

1/3 cup brown rice syrup

2 T melted coconut oil

1/4 cup almond milk with 1 T apple cider vinegar

1 tsp vanilla extract

1 tsp cinnamon

1 tsp ground ginger

1/2 tsp ground cloves

pinch salt

Process the almond meal, buckwheat flour, bicarb and dates in a food processor until crumbly. Add in remaining ingredients and stir into a moist dough*.

Drop balls onto a lined baking tray and bake at 180 deg C for 20 minutes or until brown and reasonably firm (how long you bake them for will determine whether they hold a moist, soft biscuit texture or a firmer one).

I was tempted to make up a chocolate mix and drizzle them with chocolate syrup but hey, they didn’t hang around long enough. Next time…

*NB IF you like a more dry biscuit, lessen the milk content. It is important though to keep the vinegar to offset the bicarb.


2 Comments

Double choc muffins (GF)

Double choc muffins (GF)

Double choc muffins (GF)

This recipe is YUM. There I said it. I have so much trouble getting sweetness balance right on muffins but when it is chocolate, there’s no problem because I can fill it up with date fudginess and it just works. These have the added bonus of cacao nibs which are not only good for you but give a chocolatey crunch to the muffin which is divine!

Hope you enjoy.

Ingredients

1 cup buckwheat flour

1 cup brown rice flour

1 cup tapioca/arrowroot flour

1 1/2 tsp baking powder

1 tsp bicarb soda

1 cup non dairy milk (plus 2 T apple cider vinegar)

2 T chia seeds (soaked in 1/2 cup water)

10 medjool dates, pitted and soaked

1/3 cup cacao powder

1/4 cup coconut cream (take the thick cream off the top of a tin, and leave the water)

2 T melted coconut oil

2 T brown rice oil

1 tsp vanilla extract

1/3 cup cacao nibs

Put dates and coconut cream in a food processor and blend into a paste.

Mix dry ingredients in a bowl and stir in all wet ingredients, then add nibs.

Spoon into muffin trays and bake at 180 deg C for 20 minutes or until cooked through.


4 Comments

Vanilla blueberry muffins (GF)

Vanilla blueberry muffins (GF)

Vanilla blueberry muffins (GF)

Mr 5’s school is having a muffin breakfast for Father’s Day. He sternly told me that I am not invited, and neither is Mr 3. It is strictly just for he and his dad!

Funnily enough I was asked to make some muffins for the breakfast that I’m not allowed to go to. The mum asking me said she thought I was the “guru” on healthy/gluten free/dairy free/egg free stuff so that’s why she asked me. That’s nice. I don’t know how she knows I’m into that but I’ll take that as a compliment anyway so I stopped short of saying that husband-of-mine can cook his own muffins! Lol!

These muffins seriously puffed up and exploded over the top. I think perhaps my tray was on a lean because they all headed one direction! But I don’t mind lopsided as long as they went up and not down. 🙂

The only thing I struggled with was sweetening. Especially for a school breakfast. I wanted them sweet so that people would eat them but not with sugar. So I’ve used a combo of rice bran syrup and stevia but I don’t think I love stevia. It IS sweet but sometimes too much so and I struggle to get a balance. If I had coconut palm sugar on hand I would have used that so I’ll put in some suggested adaptions if you’re a bit stevia-shy. If not, go for it. It certainly works and is natural and wont give you the blood sugar high and crash, that’s for sure. But I think coconut palm sugar and/or brown rice syrup would be superior.

Ingredients:

1 cup buckwheat flour

1 cup brown rice flour

1 cup tapioca/arrowroot flour

1 1/2 tsp baking powder

1 tsp bicarb soda

2 tsp vanilla extract

1 1/2 cups non dairy milk (plus 2 T apple cider vinegar to make it “curdle”)

1/4 cup coconut oil, melted

2 T chia seeds, soaked in 1/2 cup water

1/4 cup rice syrup

3 mini spoons of stevia (or alternatively, add 3/4 cup rice syrup or coconut palm sugar substitute)

1 cup blueberries

Mix dry ingredients together then mix in wet ingredients. Stir briefly and gently the blueberries through the mix, and bake in muffin trays for 25 minutes at 180 deg C or until cooked through.


Leave a comment

“Pop” pastry pies

"Pop" pastry pies

“Pop” pastry pies

Hah… well. Not exactly like those pop tart things I’ve heard of that you stick in a toaster. But these are close.

My sister told me how to do these recently and I cannot stress how EASY this is to do. And the possibilities are endless. They are gluten though because they involve puff pastry but are totally brilliant for kids.

My boys had an early dinner the other day so were ready for something else before bed. How’s this for an idea:

IMG_1451Instructions:
Lay 1/2 sheet of puff pastry across a toasted sandwich maker                                                                                                                           Add whatever fruit you like (banana, mango and blueberries pictured)                                                                                                                 Lay the other 1/2 sheet on top.

COOK!

It makes perfect fruit pies.

I’m thinking of savoury options for lunchboxes.

Perhaps corn and grated carrot with cauliflower alfredo sauce?

Perhaps the tomato bean base from the Shepherds pie?

Oops. I just discovered I haven’t shared the cauliflower sauce yet. Better get onto that… Let me know what you create in the mean time!

"Pop" pastry pies

“Pop” pastry pies


5 Comments

DIY date ‘bliss’ balls

Date balls

Date balls

It seems we are being asked a lot how to make these date balls. These are a total staple in our house and sometimes i make them everyday because they disappear so quickly.  Other days I manage a batch big enough that we keep them in an airtight container in the fridge for a few days. They are easy to do and even easier to mix up flavours and textures so you can’t get bored. They are also delicious, nutritious and a healthy sugar free snack.

I’ve seen them in so many cafes lately called “bliss balls”. They cost the earth to buy and never ever taste as good as home made ones! There is one little place in Port Macquarie NSW that made good ones 🙂 but that’s the only one I’ve actually liked commercially.

In the past I have posted some recipes such as Seed balls and Baci balls. Really the world of date/energy/protein/chocolate balls is your ‘oyster’ (so to speak). Here’s the breakdown:

Nuts: I use a base of almonds or cashews mostly but you can add in whatever nuts you prefer.

Dates: Add in soaked medjool dates (You don’t have to soak them, but this makes processing them easier). Usually about 10 dates to 1 cup of nuts but you can mix it up.

Seeds: Pumpkin seeds are my choice but try sunflower and chia too (noting that these will make a more textured ball). Youc an also throw in goji berries.

Cacao: There’s no chocolate ball without raw cacao powder 🙂

Protein: Tao Nutrition all the way! (this will add in countless nutrients – yes, even kale 🙂 and up your protein intake

Fats: Sometimes I add in coconut oil because it gives a gorgeous texture and is good for you. And I find I lack fats in my diet so this helps too. It is not criitical to the world of date balls though.

Flavour: Vanilla extract is delicious. Or try peanut butter (100%, no added sugar), or ground hazelnuts. Or use coconut oil and desiccated coconut. Or orange peel or peppermint essence….there are gazillions of options 🙂


Process nuts and seeds in the food processor until fine and then add the remaining ingredients. Roll into balls and refrigerate.

Sometimes I find, because I don’t measure, that the ball mix is too crumbly. This is easily countered by adding more dates – or sometimes I add in 1 T water which softens and binds the mix enough to roll into balls.

Hope this helps!

xx


Leave a comment

Wholefood apricot slice

Wholefood apricot slice

Wholefood apricot slice

This slice is in three layers but the base and top are the same ingredients. In my head I had imagined coconut but in reality we had none left! So it’s not in this recipe but FEEL FREE to add dessicated coconut to the base recipe – I think it would work quite well and it is moist enough that you could add in 1/2 cup without changing the recipe too much.

If you are a gluten eater, just replace the flour content with your usual flour. GF recipes use many flours to fill in the flavour, texture, starch components of wheat flour. But keep the almond meal. It’s good 🙂

This is very moorish – if you like apricots of course. I’m not so into figs but you could sub figs, or even just dates if you like. It is almost a cross between a slice and a cake consistency. My children and niece, nephew and  sister have all given it the thumbs up so that’s a win for me.


Base recipe:

1 cup almond meal

3/4 cup buckwheat flour

3/4 cup brown rice flour

1/2 cup arrowroot flour (or tapioca starch)

1 tsp baking powder

1/2 tsp bicarb soda

1 T chia seeds soaked in 1/2 cup water

1/2 cup melted coconut oil

1/2 cup almond milk

2 T brown rice syrup

1 T apple cider vinegar

1 tsp vanilla extract

Mix the dry ingredients in one bowl and the wet ingredients in another, then mix to combine.

Filling:

1 1/2 cups dried apricots (If you can, go organic, i.e. without all the sulphur)

5 pitted medjool dates

rind of 1/2 lemon

1 T coconut oil (melted)

Soak the apricots and dates in hot water for 20 minutes. Drain, add lemon rind and coconut oil, and puree, or until preferred consistency is met.

Assembly:

Spread half base mixture evenly into a 9×9″ dish lined with baking paper.

Carefully spoon and spread the apricot mixture on top of base and smooth down with the back of a spoon.

Spoon and spread the remaining base mixture on to the top.

Bake at 190 deg C for 25 minutes.


5 Comments

Orange and date scones


Orange and date scones

Orange and date scones

Scones are one of those things that I remember as a key thing in childhood. I’m sure I’ve mentioned this before but remember those tennis club afternoon teas and church morning teas?  Nothing like a good creamy scone lathered in butter or jam and cream at one of those gatherings! I was uber-impressed when I went to a church gathering for a friend last year and the food spread was more in line with fresh, zesty cold rice paper rolls! Unreal! He is a chef, mind you, so I’m not sure if that was my friend’s input or if that church is just exceptionally up with the eating culture of the day. Lol!

In any case, there still is nothing like a good scone – and more so when it is plant based and not going to add to one’s cholesterol rising. I find it dififuclt to take a photo that is anywhere near as good as what these taste so you’ll have to take my word for it: these are the most delicious little things ever. And I like them more than muffins.

Scones…

Now I did think these relied on butter and egg but it turns out, that’s just not the case. You could safely leave out the orange if that doesn’t appeal to you or swap the dates for cranberries or sultanas or something. Do whatever suits! But this recipe is AWESOME.

I didn’t make them gluten free (:( to the GFites) but I will attempt that in the future and see how it holds up. I’m pretty confident that my general GF mix that I like would stand up well with these scones. I’ll let you know! In the mean time…these are fantastic lunch box treats for the kids, or simple to whip up when someone springs a surprise visit and you need something with your cup of tea 🙂 You do, however, need cold coconut cream so perhaps keep some in the fridge incase of emergency unexpected visitors!

Orange and date scones

Orange and date scones

Ingredients:

2 cups wholemeal Atta flour
1 T coconut palm sugar
1 T baking powder
1/2 teaspoon salt
zest from 1 orange
1 1/4 cups cold coconut cream
8 chopped fresh dates

makes 8-12 scones

——–

Preheat oven to 200 degrees C. Line a baking tray with baking paper.

Combine flour, sugar, baking powder and salt.  Toss the date pieces through the flour mix and then pour in coconut milk. Gently mix just until everything’s combined, don’t over mix. Dough will be thick.

Transfer dough onto a floured surface and shape into a disc. Either press out shapes or using a sharp knife, cut disc into 8 or 12 wedges. Place onto prepared baking sheet 2 inches apart. Bake for 15-20 minutes or until golden brown. Serve immediately or store them in an airtight container after they have completely cooled. Enjoy!

Thanks to Transplanted (who I have just discovered) for the beautiful coconut recipe idea!


2 Comments

Orange and pomegranate muffins

Orange and pomegranate muffins

Orange and pomegranate muffins

Back from our Ironman adventure! I didn’t manage any new cooking in that time but did manage much thinking and many conversations about health and well being…it happens when surrounded by ridiculously fit and well people 🙂 (No, not me. I’m no Ironman for sure).

Despite the fact that I make a lot of muffins, I am not really a muffin eater. I’ve never really loved them. I make them for the kids.

This, however. This muffin is where it’s at. Gluten free, dairy and egg free, and refined sugar free (it has a little coconut palm sugar in it). This is so zesty, sweet, light and delicious – with little pops of the pomegranate seeds.

Yeah, I’m a genius. Patting my back all on my own :). I actually made these for breakfast last week because we were facing having to get to the airport by 7am the next day, yikes. I have a chronic illness and am not operating full speed at the best of times so this…yes. A challenge.

So I figured if i could make something light, healthy, filling and delicious to eat in the taxi on the way to the airport for breakfast – well, that would be a start! Little did I know I’d end up with something …welll… divine! It also helps that the kids love pomegranates. They call the seeds “jelly beans” and we are not, in any way, allowed to call them pomegranates. Well, not within ear shot of Mr 3.

If you don’t have all these GF flours, you can replace them with your own all purpose flour. The rice, millet and tapioca flours are what I have on hand because I like experimenting with these flours. Although I do have to say, I haven’t found an all purpose GF flour that holds up this well! I think this is also nutritionally superior too which is an added plus if you can access these flours.

3/4 cup brown rice flour
1/2 cup millet flour
1/2 cup tapioca starch
1/2 cup ground almonds
1 tsp baking powder
1 tsp baking soda
¾ tsp salt
1/3 cup coconut palm sugar
1/2 tsp stevia

2 oranges *
½ cup non dairy milk
1/4 cup coconut oil
1 tsp vanilla extract
1 pomegranate (seeds only)
1 T chia seeds (soaked in 3 T water)

* Firstly, put the oranges on to boil/simmer for 45-60 minutes. Cool, and puree in a blender.

Next, mix the dry ingredients together in one bowl and the wet ingredients together in another. Lightly stir together and spoon into muffin trays.

Bake at 180 deg C for 35 minutes. (Recipe makes 11-12, or 7-8 big ones).

Orange and pomegranate muffins

Orange and pomegranate muffins


Leave a comment

Apple, rhubarb and yoghurt muffins

Apple. rhubarb and yoghurt muffins

Apple. rhubarb and yoghurt muffins

My mum gave me a bunch of fresh rhubarb from her garden on the weekend. Having a few ideas of what to do with it, we boiled it up with some green apples and decided to freeze some batches so that I can use it over the coming weeks as ideas strike. In the meantime, I needed to make some muffins for the kids’ lunch boxes and thought apple and rhubarb sounds like a golden idea!

I used stevia in this recipe as I am really trying to move away from the use of sugar and sugar-like products. I like stevia. It doesn’t give me headaches (like sugar) for one thing but some people find it has an aftertaste. I don’t notice that, and the kids don’t seem to either so it is probably an individual thing. If you don’t use stevia, you can use rice syrup or agave or whatever your choice is. You could add dates if you’d like alternative sweetness that way.

Ingredients:

1 cup wholemeal atta flour (or GF substitute)

3/4 cup quick oats

1 tsp baking powder

1/2 tsp bicarb soda

3/4 tsp stevia powder (or 1/2 cup rice syrup or coconut palm sugar)

1 cup stewed green apple and rhubarb pieces

1/2 cup coconut yoghurt

1 tsp vanilla

2 T rice bran or coconut oil

Mix the dry ingredients together before mixing in the wet ingredients. Add to a greased muffin tray and bake at 180deg C for 15 minutes or until skewer comes out clean.

*NB if you feel your mixture is too dry, add 1/4 cup non dairy milk. I was deliberating about whether to do this or not and chose not to but it depends on your mix. It won’t hurt it! 🙂


Leave a comment

Anzac(ish) biscuits

Anzac-ish biscuits

Anzac-ish biscuits

This is a special Anzac Day edition!

In Australia we celebrate/commemorate Anzac day on 25th April each year. On this day we remember those who have fought for this country and lost their lives. Anzac stands for the Australian and New Zealand Army Corps.

On this day it is quite a strong tradition here to make “Anzac” biscuits. I think Anzac biscuits, although now are a fairly standard biscuit treat, were originally a treat from war time and on a tight budget. Usually they primarily consist of oats, sugar, honey and butter!  Ok, so in this healthy recipe I have kept the oats at least. Hence, they are called Anzac-ish biscuits!

1/2 cup soaked dates, pulverised in the food processor.

1 1/2 cups oats

2 T nut butter

1 T coconut oil

1 tsp cinnamon

1 tsp bi carb soda, dissolved in 1 T hot water

Process all ingredients in the food processor and form into balls, then press down flat on a lined baking tray. Bake at 170 deg C for 20 minutes or until brown. Enjoy!


2 Comments

Homemade coconut yoghurt

Homemade coconut yoghurt

Oh yes. It is here 🙂 And it is worth the wait.

What you will need:

1/2 cup soy or coconut yoghurt with live cultures – (or you could use dairy free probiotic pills or vegan yoghurt culture)

4 cups coconut cream

1 T rice syrup

1/4 cup tapioca flour/thickening agent

1 Thermometer

First, get your jar/s sterilised and ready and warm (either in boiling water or an oven).

Second, put iced water in your sink, ready.

Whisk the tapioca flour and 1/2 cup coconut cream until smooth. Add 2 1/2 cups coconut cream and whisk.

Heat until at 80-85 degrees Celsius (180 deg F).  Whisk in the remaining coconut cream and transfer the saucepan to the iced water in the sink to bring the temperature down.

When the temp comes down to 46 deg C (115 degF), add in the yoghurt (or culture or probiotic) and rice syrup.

Stir through, then add your yoghurt mix to jars.

The trick now is keeping them warm. There are many ways it seems!

You could heat your oven slighlty (as low as it will go), then turn it off and leave your yoghurt in there overnight (mostly people say a 60W bulb in an oven will be enough!). Make sure you don’t heat your oven so much that you bake your yoghurt! 🙂

You could wrap your jars with towels and place them in an esky with a warm wheat pack.

You could always use a yoghurt maker!

Or I’ve even read of someone who placed their bowl (with a lid) on top of their modem and put a desk lamp pointing down on top. Lol!

I placed my jar of warm yoghurt in an oven mit, wrapped it up with a towel and placed it in a small cooler bag which is heavily insulated.

Either way, it should take at least 8 hours for the cultures to grow.

Then you can pop it in the fridge and add passionfruit/raspberries – whatever you like to it as desired. Or eat it as is! YAY! I love having plain coconut yoghurt in the fridge and then of a morning, can decide which flavour I would like it. We have done vanilla, mixed berries and passionfruit so far. Blend it up with strawberries would be gorgeous too.

Here’s what the berry one looked like:

Berry coconut yoghurt

It’s a pretty involved but very quick process actually and saves a TON of money buying commercial yoghurts. Depending on how much you buy your coconut cream for, what I’ve worked out is that this costs 20-30% of the cost of buying commercial coconut yoghurt.

Amazing. EDIT: Actually, I don’t know where I got that figure from. 250ml of coconut yoghurt costs $10 to buy commercially. Say you spend $6-7 on buying coconut cream, that will actually give you 500ml of yoghurt, maybe more. I should work it out exactly but the bottom line is, it is sooo cheap to do.

IMG_5772-001